The MPG-Chip is an optional accessory for DashScan 2. It decodes information about accumulated
fuel consumption that is output by most 1986-1988 V6 ECMs and uses that information
to estimate the current fuel mileage. Unfortunately, the ECM does not output the
amount of fuel directly, but only adds up the appoximate time that the injectors
are open. Time does not translate to liters directly though, so the actual amount
of fuel also depends on many factors, mainly current fuel pressure, which in turn depends partly on
manifold vacuum, but also fuel temperature, etc. Also, the cold start injector is not accounted for either.
In short: what you get is an estimate, and certainly not a precise calculation.
However, the information displayed by DashScan2 can help you increase your mileage
by letting you know when you're wasting gas. And that's becoming more and more important
the longer we drive our Fieros.
If you want to, you can also display the total fuel used since the last ignition on.
This setting can be enabled by setting a jumper as detailed below.
Installation
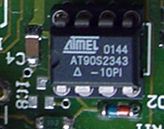
Installation of the mileage chip is simple: Remove all connectors from the DashScan
board, and insert the chip you received into the
spare socket on the DashScan board. The orientation of the chip is important, the
little notch in the chip must point in the same direction as the notch in the socket:
both point towards the little red LED. Make sure you don't break or bend any pins
of the chip, and don't force the chip into the socket. It should go in smoothly, yet
firmly. If you install the chip in the wrong direction or any of the pins
is not in the socket, you may damage the mileage chip and/or DashScan! So be
careful.
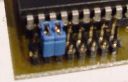
Finally, you must tell DashScan that a mileage chip is present by installing jumper 3
on the jumper field. If you would also like DashScan to display the total amount of
fuel used since last ignition on, also install jumper 2 as shown in the picture.
After you have reinstalled DashScan into the vehicle, turn on the ignition, and
watch the DashScan board. The red LED should come on after a few seconds to indicate
the chip is receiving mileage information. If it does not come on, verify that DashScan
is in trip computer mode, since mileage information is not available when in Scantool mode.
If you're in trip computer mode and still don't see the red LED, your ECM may be one of
those that don't transmit mileage information. In that case contact me for further diagnostics.
Using the new function
If you cycle through the positions, you will notice an additional display after the inside
and possibly outside temperatures, and that is the mileage information. If your in the
metric part of the world and use km for your speed display, your mileage will automatically
be displayed on a scale of 0 to 50.0 liters per 100km. As soon as the speed drops below
15 km/h, the display changes to liters per hour (l/h). If you've set the speedo to miles,
the display will be in miles per gallon. The useable range is 5-99 mpg, although values
greater than 30 are only achieved for a few seconds during deceleration. If the
car is moving slowly or you accelerate, the mileage may drop below 5mpg, in which
case DashScan displays "<5 mpg". If the vehicle is standing, mileage information
does not really make sense, so the reading will be all dashes.
Recalibration
Normally the MPG-chip is precalibrated to display a good estimate of the fuel consumption
that was averaged from the readings of a few Fieros. However, your car may be off
or you may want to get a better estimate. In that case, there is the possibility for a
recalibration of the unit.
Basically, what you will be doing is fill up your tank to get a starting point,
then drive around for a while, and then fill up your tank again, noting how much gas
you really used. While you're driving around, DashScan will display a "count" of internal
pulses that you need to write down before you refuel.
The further you drive, the higher the count, and the more precise the reading will be.
But if you turn off the ignition the count will be lost and return to zero, so don't
forget to write it down before you turn off the ignition!
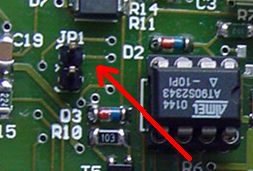
To set the unit into calibration mode, set a jumper (JP1) next to the MPG-chip, and
also set jumper 8 next to the CPU. When you cycle through the positions in
trip computer mode, the mileage and fuel readings will be gone and have been
replaced by a CAL:xxxx reading. This is the value you need to send to me for
calibration.
If you send me the amount of gas
used and the amount of pulses displayed along with the MPG-chip, I can recalibrate
the chip to display the mileage more accurately. But keep the limitations in mind that
I mentioned in the first paragraph: the mileage reading is meant as a way to get a
good estimate of the current mileage, not a precise calculation.
There have been
visitors to this site since May 31, 2000.
 The MPG-Chip is an optional accessory for DashScan 2. It decodes information about accumulated
fuel consumption that is output by most 1986-1988 V6 ECMs and uses that information
to estimate the current fuel mileage. Unfortunately, the ECM does not output the
amount of fuel directly, but only adds up the appoximate time that the injectors
are open. Time does not translate to liters directly though, so the actual amount
of fuel also depends on many factors, mainly current fuel pressure, which in turn depends partly on
manifold vacuum, but also fuel temperature, etc. Also, the cold start injector is not accounted for either.
In short: what you get is an estimate, and certainly not a precise calculation.
The MPG-Chip is an optional accessory for DashScan 2. It decodes information about accumulated
fuel consumption that is output by most 1986-1988 V6 ECMs and uses that information
to estimate the current fuel mileage. Unfortunately, the ECM does not output the
amount of fuel directly, but only adds up the appoximate time that the injectors
are open. Time does not translate to liters directly though, so the actual amount
of fuel also depends on many factors, mainly current fuel pressure, which in turn depends partly on
manifold vacuum, but also fuel temperature, etc. Also, the cold start injector is not accounted for either.
In short: what you get is an estimate, and certainly not a precise calculation.
 Finally, you must tell DashScan that a mileage chip is present by installing jumper 3
on the jumper field. If you would also like DashScan to display the total amount of
fuel used since last ignition on, also install jumper 2 as shown in the picture.
Finally, you must tell DashScan that a mileage chip is present by installing jumper 3
on the jumper field. If you would also like DashScan to display the total amount of
fuel used since last ignition on, also install jumper 2 as shown in the picture.
 To set the unit into calibration mode, set a jumper (JP1) next to the MPG-chip, and
also set jumper 8 next to the CPU. When you cycle through the positions in
trip computer mode, the mileage and fuel readings will be gone and have been
replaced by a CAL:xxxx reading. This is the value you need to send to me for
calibration.
To set the unit into calibration mode, set a jumper (JP1) next to the MPG-chip, and
also set jumper 8 next to the CPU. When you cycle through the positions in
trip computer mode, the mileage and fuel readings will be gone and have been
replaced by a CAL:xxxx reading. This is the value you need to send to me for
calibration.